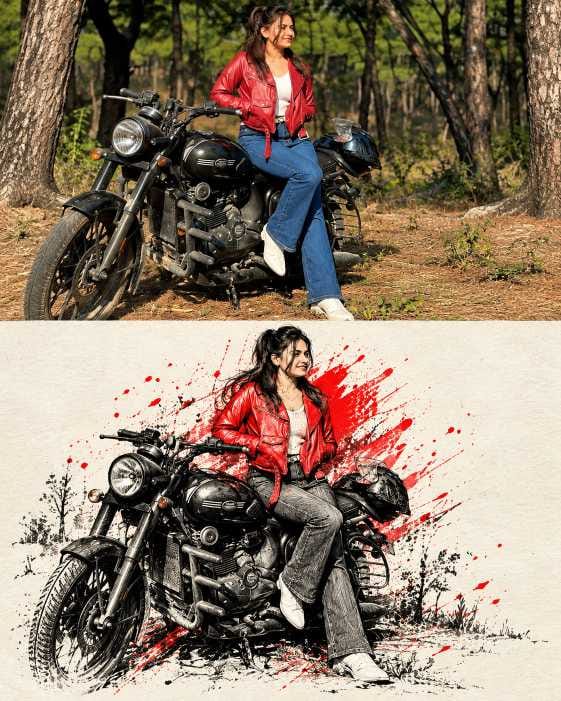
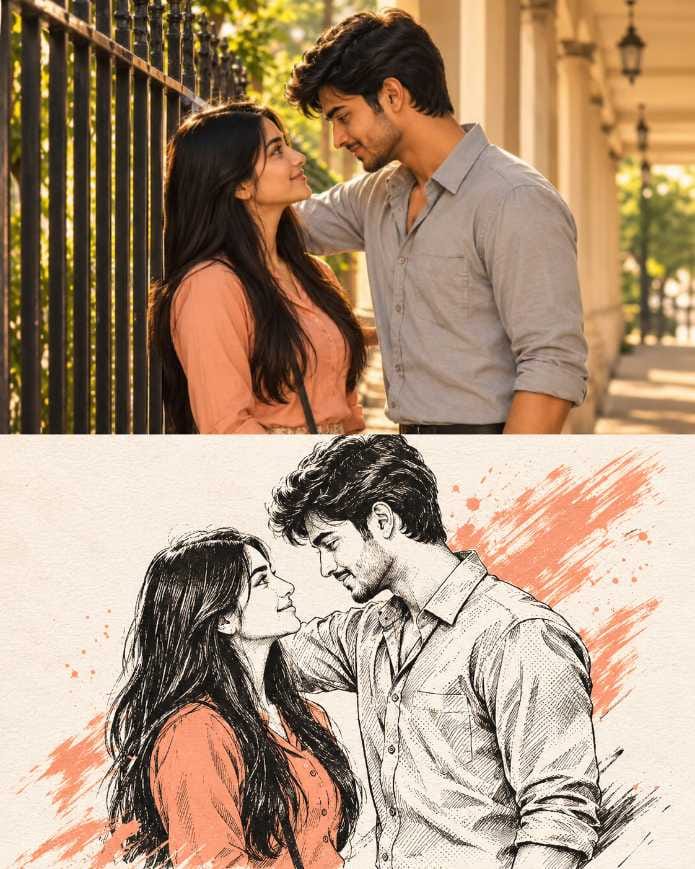
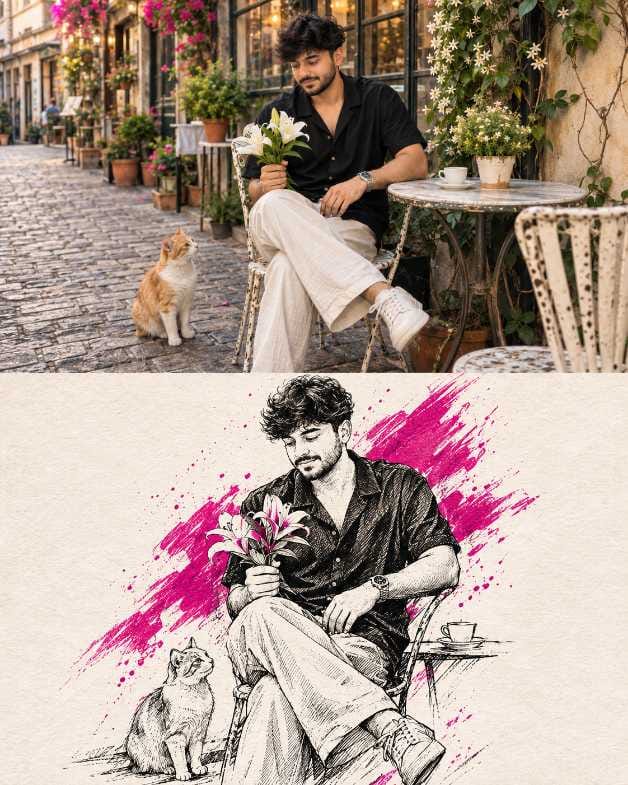
The Hand Pulled Prompt is one of the most viral and trending ChatGPT photo prompts right now. You give it a normal photo, and it gives you back a hand-drawn ink art that looks like a real poster made by an artist. The look is black and white, with bold pen lines, soft dots, and one bright colour splashed like wet paint.
That is why this Hand Pulled Prompt is getting so much love on Instagram and Reels. It is a perfect photo to sketch prompt and a fun before and after AI photo prompt for anyone who loves ink art.
At RonyTica, we have made this Hand Pulled Prompt easy for everyone. The best part is that it works for every kind of photo. You can use the boy prompt for a boy’s photo, the girl prompt for a girl’s photo, and the couple prompt for a photo of two people together. The result keeps your face, your pose, and your clothes the same, but turns the whole picture into a beautiful ink drawing.
If you want a trending Hand Pulled Prompt for your next Instagram post, profile picture, or story, you are in the right place. This ChatGPT photo prompt also works as a Gemini photo prompt, and it is a great ChatGPT photo editing prompt for ink sketch lovers. Below, you will find the Hand Pulled Prompt, how to use it, the best settings, common mistakes, and answers to the most asked questions.
Which AI Tools Work Best With This Hand Pulled Prompt?
ChatGPT is the best tool for this Hand Pulled Prompt. It reads your photo well, keeps the face the same, and draws clean ink lines with a nice paint splash. For most people, ChatGPT gives the best result in the first try, whether you use the boy prompt, the girl prompt, or the couple prompt.
⫷RonyTica Prompt Box
@img1. Everything in the result comes from here — the person, their face, hair, body, pose, clothing, equipment and setting.
@img2= THE STYLE REFERENCE. Use this ONLY as inspiration for the artistic technique: the ink linework, the hatching and halftone shading, the rough accent-colour brush strokes and splatters, the paper background and the overall graphic treatment.
Do NOT take the person, face, body, pose, clothing, objects, setting or accent colour from @image2. Nothing visible in @upload-1793347670928-cpgnoei may appear in the result — it is a look, not content.
OUTPUT: one single unified image, 4:5 vertical, split into two panels of exactly equal height — 50% top, 50% bottom — divided by one clean straight horizontal edge. Not a collage.
TOP PANEL — BEFORE: the photograph @upload-1793347676165-hgzb72w exactly as provided, unedited apart from a subtle grade. Crop intelligently to fill the landscape panel edge to edge without distorting the subject, keeping the face and the main action clearly visible. Full bleed, no margins, no border.
BOTTOM PANEL — AFTER: the same subject transformed into a mixed-media ink and paint illustration on textured off-white paper, in the artistic style of @image2.
Nothing runs continuously across the dividing edge — the two panels are separate images of the same subject, not one picture with its lower half stylised.
THE SUBJECT IN THE LOWER PANEL
Keep the subject clearly recognisable — the same face, features, expression, hairstyle, body proportions, pose and gesture, and the same clothing and equipment. Keep anything they are riding, holding or playing rendered in full detail.
Redraw them entirely in BLACK INK: confident varied-weight contour lines, dense cross-hatching in the shadows, bold solid black fills in the darkest areas, and halftone dot patterns for the mid-tones. Faces are drawn with finer, more restrained linework so the likeness stays clear; clothing, hair and hard surfaces carry the heavier hatching and black fills. Render mechanical detail precisely where it exists — spokes, frames, strings, hardware, laces, stitching — in clean ink line.
THE ACCENT COLOUR
Identify the single most dominant or meaningful colour in @upload-1793347676165-hgzb72w — a red garment, a blue sky, a yellow jacket — and make it the ONE accent colour. Do not copy the accent colour from @image2; take it from the subject photo. Everything else is strictly black and white.
Apply it as rough, energetic PAINT: wide dry-brush strokes slashing diagonally behind and across the subject, torn-edged patches, hard-edged streaks, and scattered splatters, flecks and droplets flung outward. The strokes are gestural and imperfect, with visible brush texture and dry gaps where the bristles skipped.
Let the accent fill whatever actually carried that colour in @image1, but let it break out of those shapes into loose strokes beyond their edges. Cluster the colour mass behind one side of the subject so it reads as a burst of energy, thinning out toward the opposite side.
THE BACKGROUND OF THE LOWER PANEL
Delete the original background almost entirely. Bare off-white paper with a faint natural grain — no scene, no sky, no architecture, no crowd.
Keep only a few simplified sketched elements from @image1’s setting, drawn small, loose and incomplete near the base of the figure — a suggestion of ground, a ramp, a stage edge, a few distant figures — fading into the paper with no hard boundary.
FINISH
The subject’s outer edges dissolve into brush strokes, hatching and splatters rather than ending in a clean outline. Scatter loose ink flecks, drips and spray marks around the figure, heaviest near the accent colour. Leave generous empty paper around everything.
High contrast, graphic and bold — a hand-made screenprint or ink-and-wash poster, not a digital filter.
Avoid: unequal panel heights, a visible gap or border between panels, a side-by-side layout, the lower panel continuing the upper photo, a subject sliced across the dividing edge, mismatched subjects between panels, the person or accent colour from @image2, photorealism in the lower panel, a photographic background, a full detailed scene, grey airbrushed shading, soft gradients, a clean vector look, smooth flat fills, more than one accent colour, a clean cut-out silhouette, a hard outline around the figure, a changed face, a different person, an altered outfit, a changed pose, text, logos, watermark.
Run at high edit strength (0.8+). Upload @upload-1793347676165-hgzb72w first and @upload-1793347670928-cpgnoei second.
⫷RonyTica Prompt Box
@img1. Everything in the result comes from here — the person, their face, hair, body, pose, clothing, equipment and setting.
@img2= THE STYLE REFERENCE. Use this ONLY as inspiration for the artistic technique: the ink linework, the hatching and halftone shading, the rough accent-colour brush strokes and splatters, the paper background and the overall graphic treatment.
Do NOT take the person, face, body, pose, clothing, objects, setting or accent colour from @image2. Nothing visible in @upload-1793347670928-cpgnoei may appear in the result — it is a look, not content.
OUTPUT: one single unified image, 4:5 vertical, split into two panels of exactly equal height — 50% top, 50% bottom — divided by one clean straight horizontal edge. Not a collage.
TOP PANEL — BEFORE: the photograph @upload-1793347676165-hgzb72w exactly as provided, unedited apart from a subtle grade. Crop intelligently to fill the landscape panel edge to edge without distorting the subject, keeping the face and the main action clearly visible. Full bleed, no margins, no border.
BOTTOM PANEL — AFTER: the same subject transformed into a mixed-media ink and paint illustration on textured off-white paper, in the artistic style of @image2.
Nothing runs continuously across the dividing edge — the two panels are separate images of the same subject, not one picture with its lower half stylised.
THE SUBJECT IN THE LOWER PANEL
Keep the subject clearly recognisable — the same face, features, expression, hairstyle, body proportions, pose and gesture, and the same clothing and equipment. Keep anything they are riding, holding or playing rendered in full detail.
Redraw them entirely in BLACK INK: confident varied-weight contour lines, dense cross-hatching in the shadows, bold solid black fills in the darkest areas, and halftone dot patterns for the mid-tones. Faces are drawn with finer, more restrained linework so the likeness stays clear; clothing, hair and hard surfaces carry the heavier hatching and black fills. Render mechanical detail precisely where it exists — spokes, frames, strings, hardware, laces, stitching — in clean ink line.
THE ACCENT COLOUR
Identify the single most dominant or meaningful colour in @upload-1793347676165-hgzb72w — a red garment, a blue sky, a yellow jacket — and make it the ONE accent colour. Do not copy the accent colour from @image2; take it from the subject photo. Everything else is strictly black and white.
Apply it as rough, energetic PAINT: wide dry-brush strokes slashing diagonally behind and across the subject, torn-edged patches, hard-edged streaks, and scattered splatters, flecks and droplets flung outward. The strokes are gestural and imperfect, with visible brush texture and dry gaps where the bristles skipped.
Let the accent fill whatever actually carried that colour in @image1, but let it break out of those shapes into loose strokes beyond their edges. Cluster the colour mass behind one side of the subject so it reads as a burst of energy, thinning out toward the opposite side.
THE BACKGROUND OF THE LOWER PANEL
Delete the original background almost entirely. Bare off-white paper with a faint natural grain — no scene, no sky, no architecture, no crowd.
Keep only a few simplified sketched elements from @image1’s setting, drawn small, loose and incomplete near the base of the figure — a suggestion of ground, a ramp, a stage edge, a few distant figures — fading into the paper with no hard boundary.
FINISH
The subject’s outer edges dissolve into brush strokes, hatching and splatters rather than ending in a clean outline. Scatter loose ink flecks, drips and spray marks around the figure, heaviest near the accent colour. Leave generous empty paper around everything.
High contrast, graphic and bold — a hand-made screenprint or ink-and-wash poster, not a digital filter.
Avoid: unequal panel heights, a visible gap or border between panels, a side-by-side layout, the lower panel continuing the upper photo, a subject sliced across the dividing edge, mismatched subjects between panels, the person or accent colour from @image2, photorealism in the lower panel, a photographic background, a full detailed scene, grey airbrushed shading, soft gradients, a clean vector look, smooth flat fills, more than one accent colour, a clean cut-out silhouette, a hard outline around the figure, a changed face, a different person, an altered outfit, a changed pose, text, logos, watermark.
Run at high edit strength (0.8+). Upload @upload-1793347676165-hgzb72w first and @upload-1793347670928-cpgnoei second.
⫷RonyTica Prompt Box
@img1. Everything in the result comes from here — the person, their face, hair, body, pose, clothing, equipment and setting.
@img2= THE STYLE REFERENCE. Use this ONLY as inspiration for the artistic technique: the ink linework, the hatching and halftone shading, the rough accent-colour brush strokes and splatters, the paper background and the overall graphic treatment.
Do NOT take the person, face, body, pose, clothing, objects, setting or accent colour from @image2. Nothing visible in @upload-1793347670928-cpgnoei may appear in the result — it is a look, not content.
OUTPUT: one single unified image, 4:5 vertical, split into two panels of exactly equal height — 50% top, 50% bottom — divided by one clean straight horizontal edge. Not a collage.
TOP PANEL — BEFORE: the photograph @upload-1793347676165-hgzb72w exactly as provided, unedited apart from a subtle grade. Crop intelligently to fill the landscape panel edge to edge without distorting the subject, keeping the face and the main action clearly visible. Full bleed, no margins, no border.
BOTTOM PANEL — AFTER: the same subject transformed into a mixed-media ink and paint illustration on textured off-white paper, in the artistic style of @image2.
Nothing runs continuously across the dividing edge — the two panels are separate images of the same subject, not one picture with its lower half stylised.
THE SUBJECT IN THE LOWER PANEL
Keep the subject clearly recognisable — the same face, features, expression, hairstyle, body proportions, pose and gesture, and the same clothing and equipment. Keep anything they are riding, holding or playing rendered in full detail.
Redraw them entirely in BLACK INK: confident varied-weight contour lines, dense cross-hatching in the shadows, bold solid black fills in the darkest areas, and halftone dot patterns for the mid-tones. Faces are drawn with finer, more restrained linework so the likeness stays clear; clothing, hair and hard surfaces carry the heavier hatching and black fills. Render mechanical detail precisely where it exists — spokes, frames, strings, hardware, laces, stitching — in clean ink line.
THE ACCENT COLOUR
Identify the single most dominant or meaningful colour in @upload-1793347676165-hgzb72w — a red garment, a blue sky, a yellow jacket — and make it the ONE accent colour. Do not copy the accent colour from @image2; take it from the subject photo. Everything else is strictly black and white.
Apply it as rough, energetic PAINT: wide dry-brush strokes slashing diagonally behind and across the subject, torn-edged patches, hard-edged streaks, and scattered splatters, flecks and droplets flung outward. The strokes are gestural and imperfect, with visible brush texture and dry gaps where the bristles skipped.
Let the accent fill whatever actually carried that colour in @image1, but let it break out of those shapes into loose strokes beyond their edges. Cluster the colour mass behind one side of the subject so it reads as a burst of energy, thinning out toward the opposite side.
THE BACKGROUND OF THE LOWER PANEL
Delete the original background almost entirely. Bare off-white paper with a faint natural grain — no scene, no sky, no architecture, no crowd.
Keep only a few simplified sketched elements from @image1’s setting, drawn small, loose and incomplete near the base of the figure — a suggestion of ground, a ramp, a stage edge, a few distant figures — fading into the paper with no hard boundary.
FINISH
The subject’s outer edges dissolve into brush strokes, hatching and splatters rather than ending in a clean outline. Scatter loose ink flecks, drips and spray marks around the figure, heaviest near the accent colour. Leave generous empty paper around everything.
High contrast, graphic and bold — a hand-made screenprint or ink-and-wash poster, not a digital filter.
Avoid: unequal panel heights, a visible gap or border between panels, a side-by-side layout, the lower panel continuing the upper photo, a subject sliced across the dividing edge, mismatched subjects between panels, the person or accent colour from @image2, photorealism in the lower panel, a photographic background, a full detailed scene, grey airbrushed shading, soft gradients, a clean vector look, smooth flat fills, more than one accent colour, a clean cut-out silhouette, a hard outline around the figure, a changed face, a different person, an altered outfit, a changed pose, text, logos, watermark.
Run at high edit strength (0.8+). Upload @upload-1793347676165-hgzb72w first and @upload-1793347670928-cpgnoei second.
Gemini can also work with this Hand Pulled Prompt, so you can use it as a Gemini photo prompt too. It may not keep the ink style as sharp as ChatGPT, but it is a good second choice if you like to try more than one tool. If you want the most trending and viral look, we suggest you start with ChatGPT and then test the same Hand Pulled Prompt in Gemini to compare.
How to Use the Hand Pulled Prompt in ChatGPT
Using this Hand Pulled Prompt is very simple. Follow these steps, and you will get your ink art in a few minutes. These steps are the same for the boy prompt, the girl prompt, and the couple prompt.
Open ChatGPT on your phone or computer and start a new chat.
Pick one clear photo. Use a boy photo for the boy prompt, a girl photo for the girl prompt, or a photo of two people for the couple prompt.
Copy the Hand Pulled Prompt from the RonyTica prompt box above that matches your photo.
Upload your photo first in the chat.
If the prompt asks for a style sample image, upload it after your photo.
Paste the Hand Pulled Prompt in the chat box and press send.
Wait for ChatGPT to finish. Your ink sketch art will appear in some time.
If you do not like the first result, press regenerate and try again.
Come back to RonyTica anytime you need more viral and trending prompts like this Hand Pulled Prompt.
Simple Tips to Know Before You Try This Prompt
Before you use the Hand Pulled Prompt, a few small things can make your result much better. First, choose a photo where the face is clear and not blurry. A sharp photo helps the boy prompt, girl prompt, and couple prompt keep your face looking just like you.
Second, pick a photo with one strong colour, like a red jacket, a blue sky, or a yellow dress. The Hand Pulled Prompt picks the main colour from your photo and uses it as the paint splash. So a photo with a strong colour gives a more beautiful and trending result.
Third, use a photo where your full pose is visible. The couple prompt works best when both people are close and clearly seen. The girl prompt and boy prompt work great with sitting, standing, or walking photos. A photo with a bike, a cat, a guitar, or a bouquet also looks amazing, because the Hand Pulled Prompt draws these small things in fine detail.
Best Settings for the Hand Pulled Prompt
Use the settings in this table to get the best result from the Hand Pulled Prompt. They work for the boy prompt, the girl prompt, and the couple prompt.
Setting
What to Choose
Best AI Tool
ChatGPT (Gemini as a second option)
Photo Quality
Clear, sharp, and well lit
Photo Type
Boy photo, girl photo, or couple photo
Image Shape
Vertical (4:5 works best)
Upload Order
Your photo first, style sample next (if asked)
Main Colour
Taken from the strongest colour in your photo
Face Detail
Keep the face clear and front or side facing
If Result Is Not Good
Press regenerate and try again
Common Mistakes People Make With This Prompt
The most common mistake is using a blurry or dark photo. When the photo is not clear, the Hand Pulled Prompt cannot draw the face properly, and the boy prompt or girl prompt result looks different from you. Always pick a bright and sharp photo.
Another mistake is changing the Hand Pulled Prompt too much. Some people remove lines or add their own words, and the ink style goes wrong. Copy the prompt as it is from RonyTica and paste it fully. This keeps the trending look safe.
Many people also upload the photos in the wrong order. Upload your own photo first, and only then add the style sample if the prompt asks for it. For the couple prompt, do not use a photo where the two faces are too small or far apart. Finally, do not give up after one try. AI results can change each time, so regenerate once or twice before you decide.
Why You Will Love This Hand Pulled Prompt
This Hand Pulled Prompt gives your photo a hand-made poster look that does not look like a normal filter. The ink lines, the soft dots, and the bold paint splash feel like real art. That is why it is so viral and trending right now.
The boy prompt gives a strong and stylish look, the girl prompt gives a soft and artistic look, and the couple prompt gives a lovely and romantic feel. Your face and style stay the same, so people can still know it is you. The art also looks great as an Instagram post, a WhatsApp DP, a story, or a gift for someone special. And it is free to try with ChatGPT. It is a photo to sketch prompt and an AI ink sketch prompt in one, and it gives a black and white sketch with colour splash look. Your before and after AI photo prompt result is ready to post in minutes. This is a big reason why the Hand Pulled Prompt is one of the best trending ChatGPT photo prompts to try today.
Conclusion
The Hand Pulled Prompt is a simple and fun way to turn any photo into beautiful ink art. Whether you use the boy prompt, the girl prompt, or the couple prompt, the result looks creative, stylish, and made by hand. Just pick a clear photo, use this ChatGPT photo prompt, copy the prompt, and enjoy your viral ink sketch with a beautiful before and after look.
We hope this guide from RonyTica helped you. Try the Hand Pulled Prompt today, share your art with your friends, and keep visiting RonyTica for more trending and viral AI photo prompts every week.
Frequently Asked Questions
Q.1) What is the Hand Pulled Prompt?
The Hand Pulled Prompt is a viral ChatGPT photo prompt that turns your normal photo into a black ink sketch with one bright paint-splash colour. It looks like a poster drawn by hand.
Q.2) Can I use the Hand Pulled Prompt for boys, girls, and couples?
Yes. The same Hand Pulled Prompt works as a boy prompt, a girl prompt, and a couple prompt. Just upload the right photo and the AI does the rest.
Q.3) Is the Hand Pulled Prompt a ChatGPT photo editing prompt or a photo to sketch prompt?
It is both. This ChatGPT photo editing prompt works as a photo to sketch prompt and an AI ink sketch prompt, and the result shows a clear before and after look.
Q.4) Can I use the Hand Pulled Prompt as a Gemini photo prompt?
Yes. You can try it as a Gemini photo prompt, but ChatGPT usually gives the best ink sketch result.
Q.5) Which is the best AI tool for the Hand Pulled Prompt?
ChatGPT is the best tool for this Hand Pulled Prompt. Gemini can also be tried as a second option.